Install and Activate your eSIM on your iPhone or iPad Cellular (Simplified guide)
📱 How to Install and Activate Your eSIM on iOS iPhone or iPad cellular (from AirSims.com.au)
It’s simple! Follow these steps before you fly and when you land. ✈️
✅ Before Take Off
-
Check your iPhone: Make sure your phone works with eSIM. (Tip: Dial
*#06#and look for EID on the screen.) - Turn on Wi-Fi: You must have Wi-Fi to set up your eSIM. Do this at home before your trip.
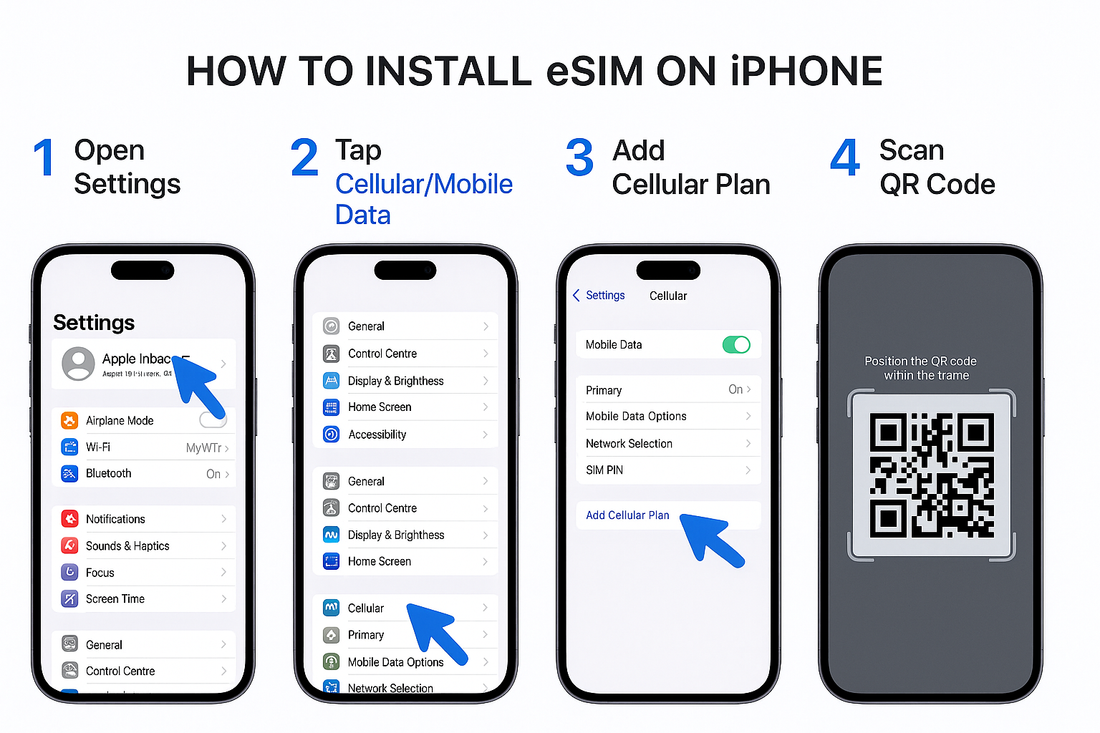
- Find your QR code: Open the email from Airsims.com.au. This email has your special QR code.
-
Scan the QR code:
- Go to Settings → Mobile Data → Add eSIM.
- Choose Use QR Code.
- Point your camera at the QR code in your email.
- Done! 🎉 Your eSIM is now saved in your iPhone. Don’t delete it.
🛬 When You Land
- Turn on your eSIM: Go to Settings → Mobile Data. Switch your AirSims eSIM to ON.
- Turn on data roaming: In the same menu, tap your AirSims eSIM and switch Data Roaming to ON.
- Wait a minute: Your iPhone will connect to the local network. 🌐
- All set! You can now use the internet, maps, and chat apps on your trip. 🎒
ℹ️ Sub-Note for iOS (iPhone/iPad) Users
Sometimes, if you turn on your AirSims eSIM before you reach your travel country, your iPhone might show a “Not Valid” or “Activation Error”. Don’t worry – this is false. This is a quirk with iOS 16.4 and above. We have a detailed guide that explains. Your eSIM will work fine once you land at your destination and connect to the local network. 🌏
💡 Helpful Tips
- Install your eSIM a day or two before flying, while you have Wi-Fi.
- Keep your QR code email safe (or even have a print out) in case you need it again.
- If something doesn’t work, restart your iPhone and check your settings.
AirSims.com.au – fast and easy travel internet for over 150 countries 🌏


